Solving WSL 2 Docker File Permission Issues
In the early days, my Docker environment was set up on Windows. However, most tutorials and configuration resources online are based on Linux environments. Coupled with the path differences between Windows and Linux file systems (e.g., C:\ vs /mnt/c), I often spent a lot of time on conversion and debugging.
Furthermore, while accessing the Windows file system via WSL 2 is convenient, there is always a performance penalty for cross-OS file I/O. To pursue a more native Linux experience and better performance, I eventually migrated all my Docker Compose projects to WSL 2.
The Permission Hell I Encountered
After migrating to WSL 2, I got into the habit of using Visual Studio Code (VS Code) on Windows with the Remote - WSL extension, using it as my file browser and editor within WSL.
However, I ran into a tricky problem: I could not directly access files created after a Docker container started.
This is mainly because Docker containers usually run as root by default. Consequently, files mounted (Volume) to the host (WSL) also become owned by root. Since the user I log into WSL with is typically a standard user created during setup (e.g., wing), VS Code would throw a Permission Denied error when trying to read or write these root-owned files as a standard user.
For command-line gurus, a quick sudo vim or sudo nano might solve it. But as someone who relies heavily on the GUI, my development experience would be severely hampered if I couldn't just double-click to open and edit files in VS Code.
Solutions I Tried
I searched for various methods to solve this:
- Modify file permissions: Manually changing file permissions (
chmod/chown) or setting the container User. The results were often incomplete, and sometimes I accidentally caused VS Code connection permission errors.
The Brute-Force Solution
Eventually, I couldn't take it anymore and decided to use the "nuclear option": I directly modified the WSL configuration file /etc/wsl.conf to change the default login user to root.
# /etc/wsl.conf
[user]
default = rootWARNING
This is an extremely insecure practice. Changing the default user to root grants you full administrative privileges for all operations within WSL. If you accidentally execute a malicious script or make a mistake (e.g., rm -rf /), the consequences could be catastrophic. Please do not imitate this in production or critical work environments.
Since this is just my local development machine, the file permission issues disappeared, and I could happily edit any file with VS Code.
A Slightly Safer Solution: Dev Containers
Until recently, while discussing this frustration with Gemini, it suggested I try Dev Containers.
What are Dev Containers?
Dev Containers (Development Containers) is a VS Code extension that allows you to package your entire "development environment" into a Docker container.
What problems does this solve?
- Environment Consistency: No need to install Node.js, Python, etc., on WSL first; the environment is ready once the container starts.
- Automatic Identity Synchronization (Solving Permission Issues): This is the most critical point. Linux recognizes UIDs (numeric IDs) rather than account names. When Dev Containers start, they automatically modify the UID of the user inside the container to match the one outside in WSL (e.g., 1000). This means files you create inside the container appear as "yours" on the host, naturally avoiding
Permission Deniedissues. Note, however, that this mechanism cannot solve the case where "Docker Compose services force files to be created as root," which is why we need special configuration later.
Dev Containers in Action
Next, I will explain how to set up a basic Dev Container environment.
Creating a Workspace
Assume I use the directory /home/wing/docker as the workspace for my Dev Container.
Step 1: Initialize Dev Container Configuration
For an empty project, we can generate the configuration file using VS Code commands.
Press
F1orCtrl+Shift+Pto open the Command Palette.Type and select Dev Containers: Add Dev Container Configuration Files....

A menu will appear asking which definition to use.
- If it's a Node.js project, you can select
Node.js. - If you just want a clean environment, you can select
UbuntuorDebian. Since my WSL is Ubuntu-24.04 and I just need it to build a Docker environment, I will select Show All Definitions... and then search for and select Ubuntu as a demonstration.
- If it's a Node.js project, you can select
Select the version (e.g.,
noblefor Ubuntu 24.04).You will then be asked if you need to install additional features. Search for and check
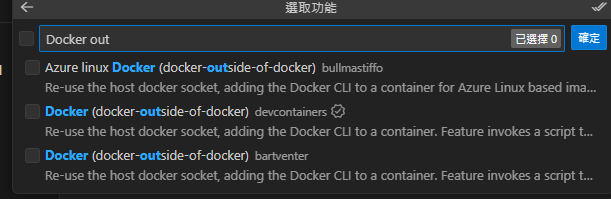
Docker (outside of Docker).TIP
- Note that multiple options with the same name may appear in the search results. Be sure to select the version maintained by devcontainers (usually with an official badge) to ensure best compatibility.
- Docker (outside of Docker) does not have Docker functionality itself; it simply creates a Docker client inside the container to control the external (Host) Docker engine.
The
Docker (outside of Docker)configuration options will appear:- Select or enter a Docker/Moby CLI version: Select
latest(default). - Do you want to keep the feature defaults or configure options?: Select "Configure options".
- Select boolean options for 'Docker (docker-outside-of-docker)':
installDockerBuildx: Check.installDockerComposeSwitch: Check.moby(Install OSS Moby...): Uncheck. I only need the standard Docker CLI to control the external Docker Desktop; I don't need the Moby OSS version.
- Compose version to use for docker-compose: Select
v2. - Include the following optional files/directories (
.github/dependabot.yml): Uncheck. This is just a simple local development environment; no need for GitHub Dependabot automated dependency updates.
- Select or enter a Docker/Moby CLI version: Select
At this point, VS Code will create a .devcontainer folder in your project directory, containing the devcontainer.json configuration file.
// For format details, see https://aka.ms/devcontainer.json. For config options, see the
// README at: https://github.com/devcontainers/templates/tree/main/src/ubuntu
{
    "name": "Ubuntu",
    // Or use a Dockerfile or Docker Compose file. More info: https://containers.dev/guide/dockerfile
    "image": "mcr.microsoft.com/devcontainers/base:noble",
    "features": {
        "ghcr.io/devcontainers/features/docker-outside-of-docker:1": {
            "installDockerBuildx": true,
            "installDockerComposeSwitch": true,
            "version": "latest",
            "dockerDashComposeVersion": "v2"
        }
    },

    // Features to add to the dev container. More info: https://containers.dev/features.
    // "features": {},

    // Use 'forwardPorts' to make a list of ports inside the container available locally.
    // "forwardPorts": [],

    // Use 'postCreateCommand' to run commands after the container is created.
    // "postCreateCommand": "uname -a",

    // Configure tool-specific properties.
    // "customizations": {},

    // Uncomment to connect as root instead. More info: https://aka.ms/dev-containers-non-root.
    "remoteUser": "root"
}TIP
"remoteUser": "root" is commented out by default. If you are using Bind Mounts for Volumes, you must enable this line; otherwise, you won't be able to edit files with root permissions generated by Docker Compose.
WARNING
If you modify devcontainer.json, you must Rebuild for the changes to take effect.
Theoretically, a notification will pop up in the bottom right corner when you modify it, and you can click the button to execute. If you missed it, refer to "Step 2: Open in Container" below to run it again.
Step 2: Open in Container
- Press
F1orCtrl+Shift+P. - Type and select Dev Containers: Reopen in Container.
VS Code will start building the Docker Image (the first time takes longer) and start the container.
Step 3: Experience the Results
When the green status bar in the bottom left shows Dev Container: Ubuntu..., it means you have successfully entered the container!
You can now open the terminal, and you will find yourself inside the container.
To verify that this is a complete Docker development environment, let's try creating a compose.yml:
services:
  searxng:
    image: searxng/searxng:latest
    container_name: searxng
    ports:
      - "8080:8080"
    volumes:
      - ./volumes/searxng:/etc/searxng
restart: unless-stoppedDo not start Docker Compose directly in this workspace; it is recommended to start it outside the Dev Container.
WARNING
This is mainly because I personally prefer using Bind Mounts (mounting local directories to the container), but Bind Mounts are prone to permission issues.
With docker-outside-of-docker (DooD), because the Dev Container only controls the external (Host) Docker Daemon via a Socket, when you send a command to the Daemon to mount ./volumes, the Daemon looks for the path from the Host's perspective, not the Dev Container's internal path. This leads to path mapping errors, where files created after the container starts cannot be accessed correctly or result in empty directories.
For details, refer to the official documentation: Using Docker from Docker (Docker-outside-of-Docker)
However, if you use Named Volumes, you can avoid the path resolution issues between Host/Container caused by Bind Mounts in DooD. You can even add "postCreateCommand": "docker compose up -d" in devcontainer.json for one-click setup. It feels like I, who insists on using Bind Mounts, should be phased out.
Here is a comparison:
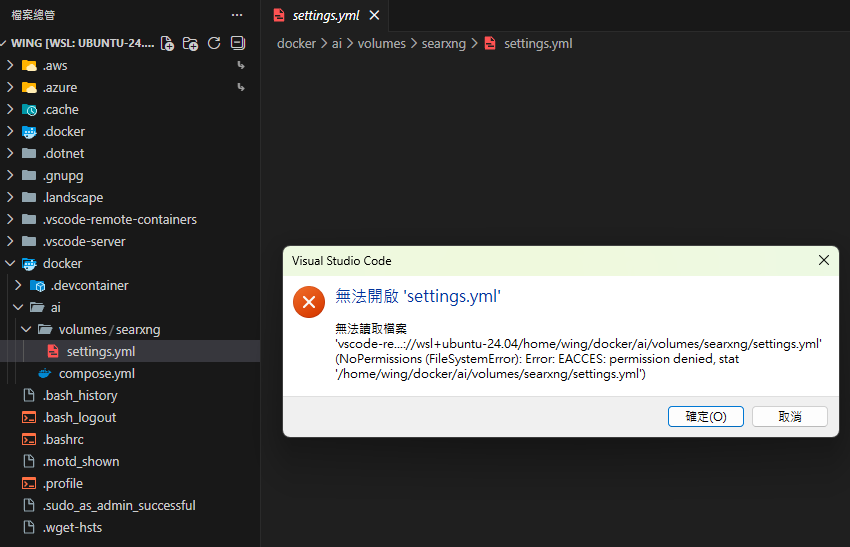
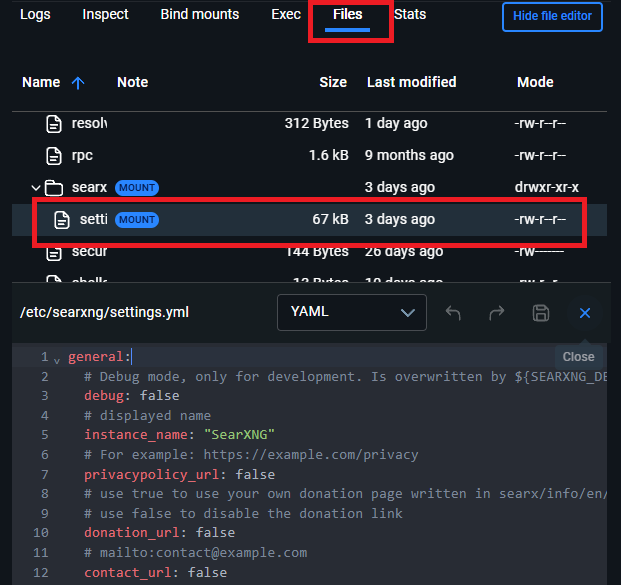
If we are outside the Dev Container (the original WSL workspace), we find that we cannot directly edit settings.yml under volumes due to permission issues:
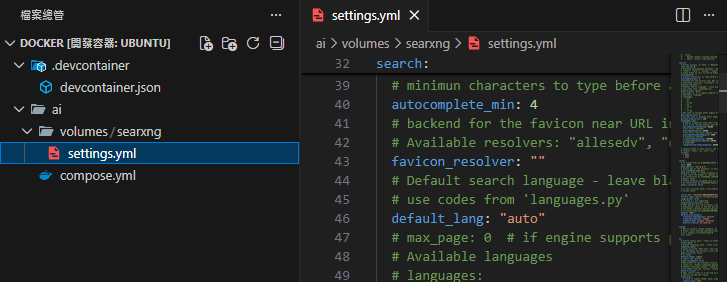
But inside the Dev Container, we can open and edit the file normally:
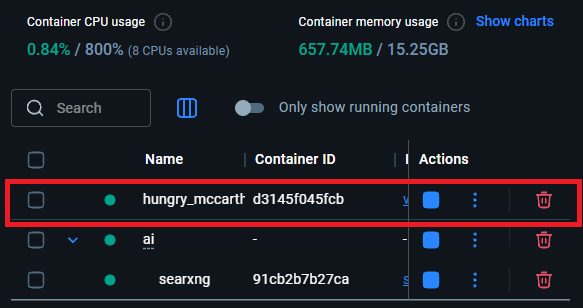
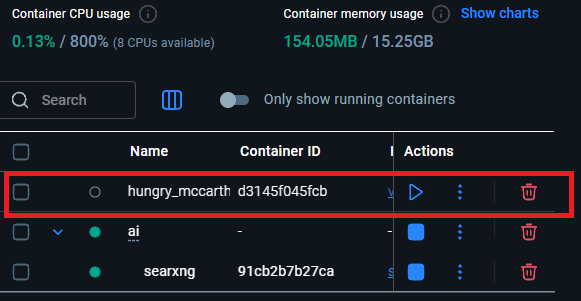
When VS Code with a Dev Container is open, checking the Docker Container list will show an extra container (like hungry_mccarthy in the image below); this is the Dev Container itself:
And when you close that VS Code window, this Dev Container will automatically stop:
Another Option: Integrate Dev Container directly into Docker Compose
If you feel that creating a .devcontainer folder and maintaining extra configuration files for Dev Containers is too troublesome, or if you want this development environment to be visible directly in the project's compose.yml, you can adopt the "manually add a tool container" approach.
The concept here is: add an extra container specifically for running VS Code (let's call it vscode-editor) in compose.yml, put it on the same network as other services (like databases, Redis), so you can solve file permission issues while debugging other services directly from within the container.
Step 1: Modify compose.yml
Add a vscode-editor service to compose.yml:
services:
  # ... Existing services (searxng, database, etc.) ...

  vscode-editor:
    # Use the official Microsoft-maintained Dev Container base image (same as standard Dev Container)
    image: mcr.microsoft.com/devcontainers/base:ubuntu-24.04
    container_name: vscode-editor
    # Keep the container running, waiting for us to connect
    command: sleep infinity
    # Start as root here, the most brute-force way to solve mount permission issues
    user: root
    volumes:
      # Determine the path range to mount into the container; can be a single project (./) or a common parent directory for multiple services (see Tip below)
      - ./:/workspace
    working_dir: /workspace
    # Ensure it joins the same network for easy pinging or connecting to other containers
    networks:
- defaultTIP
Regarding how large the Workspace scope should be: I don't have a standard answer, but I'll share my personal thoughts:
- If there are many services on the same network: I would consider mounting the smallest common parent directory that covers these services. This makes
compose.ymlcleaner, avoids listing a long list of volumes, and allows managing multiple related services in the same VS Code window. - If there are few services on the same network: For example, if only one or two containers need frequent modification, just list the specific folders. This keeps the environment as simple as possible and avoids accidentally touching unrelated files inside the container.
TIP
If you don't want these "development tool" container settings (pollution) to mix into the production compose.yml, you can move the vscode-editor configuration block to compose.override.yml.
Docker Compose automatically reads and merges the content of the override file upon startup, keeping the main configuration file clean (containing only production services) while allowing seamless use of Dev Containers in the development environment.
Start the project:
docker compose up -dStep 2: Attach to a Running Container
After starting, this vscode-editor container will wait in the background. Now, we connect to it via VS Code:
Press
F1orCtrl+Shift+Pto open the Command Palette.Type and select Dev Containers: Attach to Running Container....

Select the
vscode-editorcontainer we just created from the menu.
VS Code will open a new window and connect to the inside of the container. Then, select Open Folder and enter the path /workspace we mounted earlier.
Step 3: Fix Permission Settings (Configure devcontainer.json)
Although user: root is already specified in the YAML, to ensure that VS Code extensions and terminal behavior are consistent, it is recommended to create a configuration file for this container.
In the connected window, press
F1.Search for and select Dev Containers: Open Container Configuration File.


VS Code will create a dedicated configuration for this "attached container." Add
"remoteUser": "root"inside it:
{
    "workspaceFolder": "/workspace",
    "remoteUser": "root"
}This way, all modifications you make to files within /workspace inside the container will be executed as root, perfectly solving the permission issues generated by other Docker Compose services.
TIP
What happened to the "Rebuild" command? If you saw the rebuild prompt after editing devcontainer.json for the first time but can't find it in the command palette later, don't worry, this is normal.
If you modify the settings (e.g., switching remoteUser) and want to apply them, the simplest way is to press F1 and execute Developer: Reload Window. The settings will take effect after reconnecting.
The biggest advantage of this approach is: The development environment itself is part of the infrastructure, ready to use at any time without extra initialization steps.
Alternative: Docker Desktop Built-in Editor
Besides Dev Containers, if you only need to quickly modify a few files, the Docker Desktop GUI now supports editing files inside containers directly:
Conclusion
Although I still used root with Dev Containers, which doesn't quite reflect the original intent of Dev Containers (User Mapping), at least this limits the root execution to the Dev Container itself rather than the entire WSL being root. Furthermore, the container does not default to reading files outside the Dev Container scope, making permissions relatively safer (hopefully).
Changelog
- 2026-01-19 Initial document creation.
- 2026-01-22 Added another approach for integrating Dev Containers into Docker Compose.
- 2026-02-04 Added suggestions regarding the use of
compose.override.yml.