ASP.NET Core Web API 入門心得
前言
客戶希望我解釋目前開發的 Web API 專案。原本我只打算針對該專案進行說明,但後來客戶提到也希望了解如何簡單建立和開發 ASP.NET Core Web API。在構思簡報的過程中,想不到一個適當的方式來呈現,於是我決定先撰寫一份筆記,專注於通用的、與專案內容無關的基本知識。
本篇文章內容僅針對比較基本或是有在使用的部分進行說明,完整的內容還是請參考 MSDN 使用 ASP.NET Core 建立 Web API 說明。
建立專案
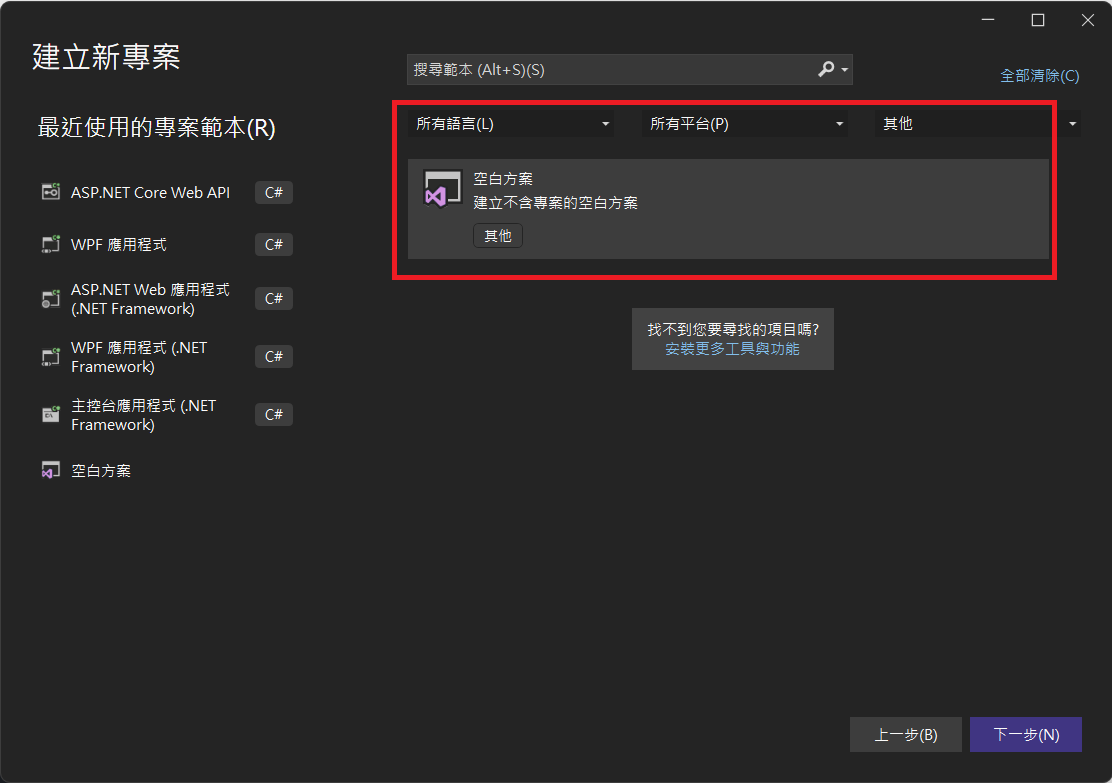
我通常不會直接建立專案,而是先建立一個「空白方案」。如果在 Visual Studio 中找不到「空白方案」選項,可以檢查 Visual Studio Installer,看與範本相關的專案是否已經選中,例如「其他專案範本(舊版)」或「.NET Framework 專案與專案範本」。我印象中,應該是前者,但有點不太確定。
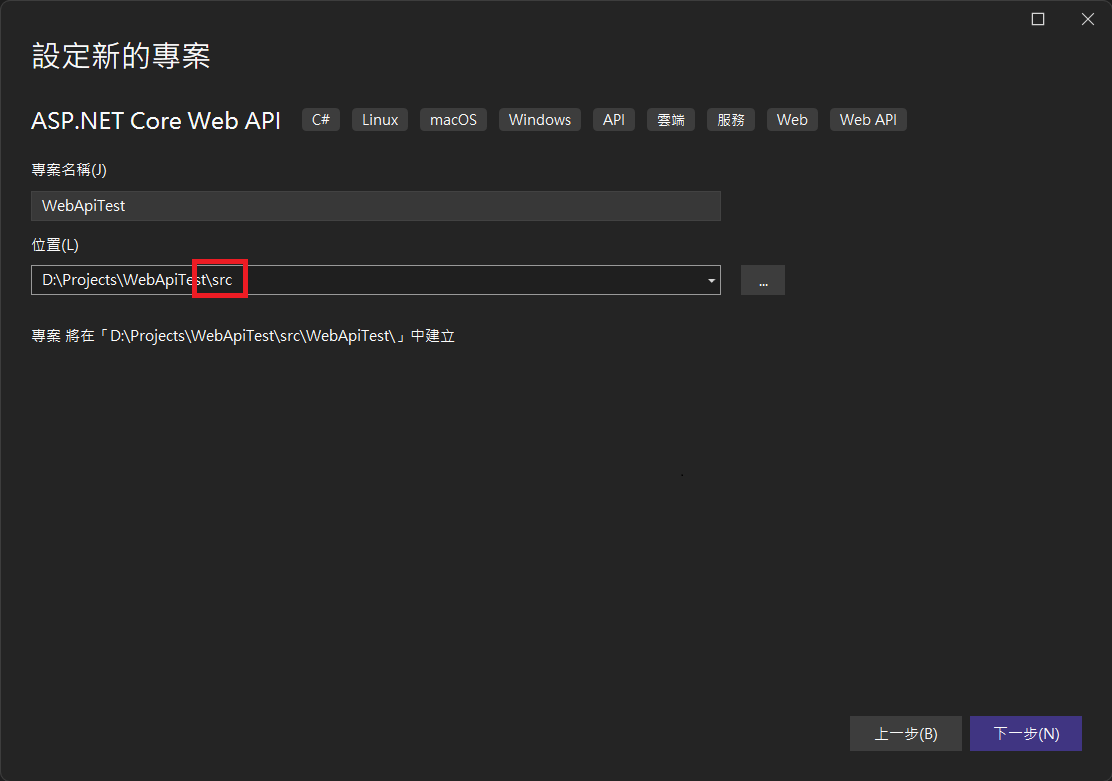
建立 Web API 專案時,選擇「ASP.NET Core Web API」。

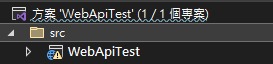
習慣上,我會將專案路徑放到「src」資料夾底下。
這邊針對下圖「其他資訊」的幾個設定進行說明:

啟用 OpenAPI 支援: 勾選這個會預設安裝「Swashbuckle.AspNetCore」,且會在「Program.cs」增加 Swagger 相關程式碼。
不要使用最上層陳述式: 上層陳述式是 C# 9.0 中加入的功能。簡單來說,一般的程式通常使用 Main 方法作為進入點,但當採用最上層陳述式時,位於「Program.cs」檔案中的程式碼將不再需要 Program 類別和 Main 方法。這樣的設計旨在簡化程式碼結構。更詳細的資訊可以參考 最上層語句 - 沒有 Main 方法的程式。
使用控制器: 如果沒有勾選,最使用最小 API 的方式來建立,詳情可參考 最小 API 概觀。
建立方案資料夾以利分類專案:
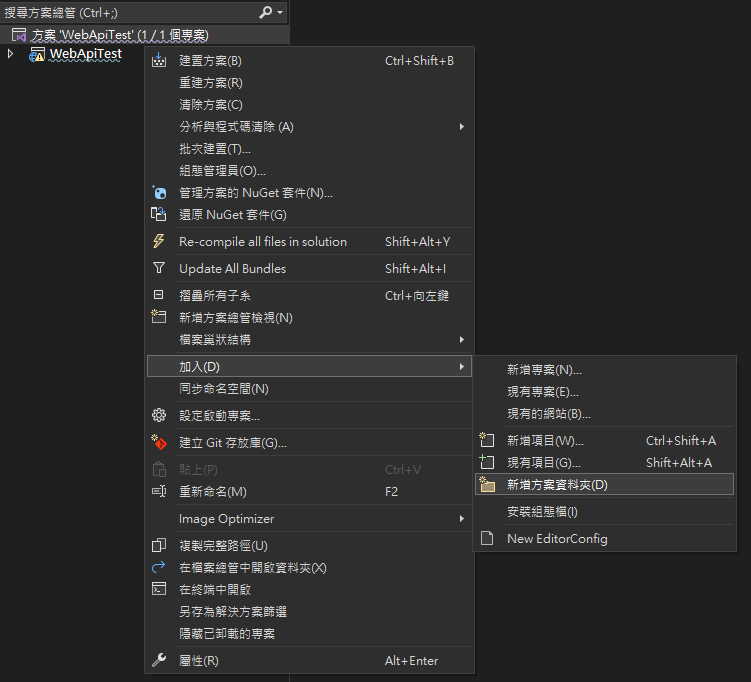
將專案移至「src」方案資料夾底下:
程式碼說明
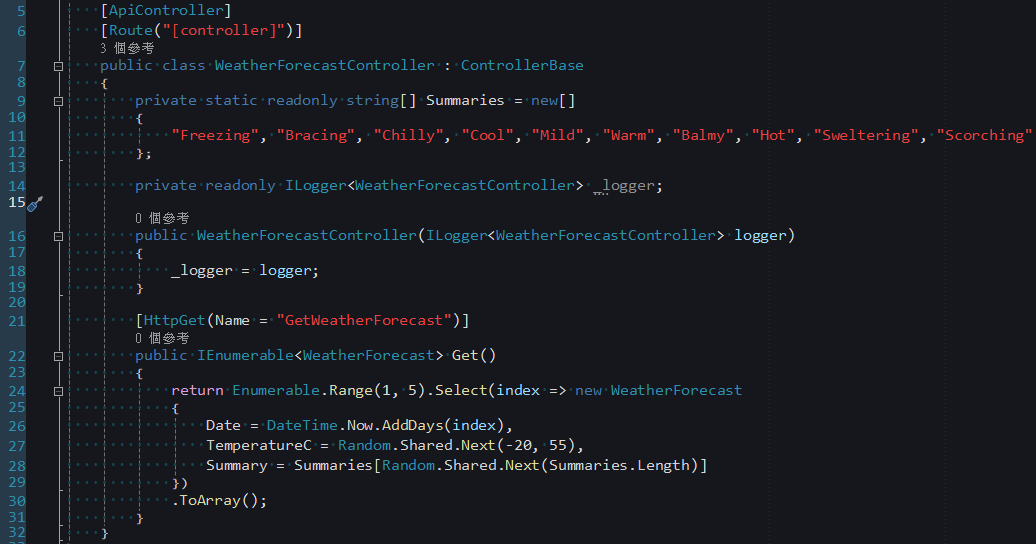
建立 Web API 專案時,預設生成以下範例程式碼,接下來針對這部分進行解說。
ControllerBase
ASP.NET Core 與 ASP.NET Framework 不同,其 MVC 和 Web API 的 Controller 並非來自不同的組件,而是均源自相同的基礎組件。在 ASP.NET Core 中,MVC 預設繼承 Controller,而 Web API 則預設繼承更上層的 ControllerBase。Controller 額外提供一些與 View 相關的 API,以及三個 Filter 相關的事件:OnActionExecuting、OnActionExecuted 和 OnActionExecutionAsync。
若同一個 Web API Controller 需要同時支援 View 和 Web API,或者需要在 Controller 中處理 OnActionExecuting 等事件,則可改繼承 Controller 以滿足相應需求。
ApiController
Web API 的 Controller 可以看到設定了 ApiController 的 Attribute,根據 MSDN 描述,將執行以下行為:
- 屬性路由需求。
- HTTP 400 自動回應
- 繫結來源參數推斷。
- 多部分/表單資料要求推斷。
- 錯誤狀態碼的問題詳細資料。
若不想每個 Controller 都加入 ApiController Attribute,可透過定義一個 BasicController 的父類別來實現。這個 BasicController 可以繼承自 Controller 或 ControllerBase,然後將各個 Web API Controller 都繼承 BasicController。
// 定義 BasicController 父類別
[ApiController]
public class BasicController : ControllerBase {
    // 這裡可以加入共享的邏輯或屬性
}

// 具體的 Web API Controller 繼承 BasicController
public class MyController : BasicController {
    // 這裡實現 Web API 邏輯
}此外,如果希望停用 ApiController 的部分行為,可以在 Program.cs 中進行如下調整:
builder.Services.AddControllers()
    .ConfigureApiBehaviorOptions(options => {
        // 停用 HTTP 400 自動回應
        options.SuppressModelStateInvalidFilter = true;

        // 停用多部分/表單資料要求推斷
        options.SuppressConsumesConstraintForFormFileParameters = true;

        // 停用繫結來源參數推斷
        options.SuppressInferBindingSourcesForParameters = true;

        // 停用錯誤狀態碼的問題詳細資料
        options.SuppressMapClientErrors = true;
});屬性路由需求
在 ASP.NET Core Web API 中,當設定 ApiController 後,將會改成使用 Route Attribute 進行慣例路由的設定。Route Attribute 可以設定在父類別 Controller、目前的 Controller,或是具體的 Action 上,優先權由高到低分別為 Action > Controller > 父類別 Controller。以下是一些常見的設定範例:
RESTful 風格
[Route("[controller]")]
public class MyController : BasicController {
    // GET: /My
    [HttpGet]
    public IActionResult Get() {
        // 實作取得資源的邏輯
        return Ok("GET method");
    }

    // GET: /My/1
    [HttpGet("{id}")]
    public IActionResult GetById(int id) {
        // 實作取得特定資源的邏輯
        return Ok($"GET method with id {id}");
    }

    // POST: /My
    [HttpPost]
    public IActionResult Post([FromBody] MyModel model) {
        // 實作新增資源的邏輯
        return Ok("POST method");
    }

    // PUT: /My/1
    [HttpPut("{id}")]
    public IActionResult Put(int id, [FromBody] MyModel model) {
        // 實作更新資源的邏輯
        return Ok($"PUT method with id {id}");
    }

    // PATCH: /My/1
    [HttpPatch("{id}")]
    public IActionResult Patch(int id, [FromBody] MyPatchModel model) {
        // 實作部分更新資源的邏輯
        return Ok($"PATCH method with id {id}");
    }

    // DELETE: /My/1
    [HttpDelete("{id}")]
    public IActionResult Delete(int id) {
        // 實作刪除資源的邏輯
        return Ok($"DELETE method with id {id}");
    }
}非 RESTful 風格
[Route("[controller]/[action]")]
public class MyController : BasicController {
    // GET: /My/GetAll
    [HttpGet]
    public IActionResult GetAll() {
        // 實作取得資源的邏輯
        return Ok("GET method");
    }

    // GET: /My/GetById/1
    [HttpGet("{id}")]
    public IActionResult GetById(int id) {
        // 實作取得特定資源的邏輯
        return Ok($"GET method with id {id}");
    }

    // POST: /My/Create
    [HttpPost]
    public IActionResult Create([FromBody] MyModel model) {
        // 實作新增資源的邏輯
        return Ok("POST method");
    }

    // POST: /My/Update/1
    [HttpPost("{id}")]
    public IActionResult Update(int id, [FromBody] MyModel model) {
        // 實作更新資源的邏輯
        return Ok($"PUT method with id {id}");
    }

    // POST: /My/Delete/1
    [HttpPost("{id}")]
    public IActionResult Delete(int id) {
        // 實作刪除資源的邏輯
        return Ok($"DELETE method with id {id}");
    }
}增加前綴詞
[Route("api/[controller]")]
public class MyController : BasicController {
    // GET: api/My
    [HttpGet]
    public IActionResult Get() {
        // 實作取得資源的邏輯
        return Ok("GET method");
    }
}需要注意的是,過去在 ASP.NET Framework Web API 中,可透過 Action 名稱的開頭來辨識 HTTP 動詞(例如 GetAll() 就是對應 GET 請求),但現在變為和 MVC 一樣使用 HttpGet、HttpPost、HttpPut、HttpPatch和HttpDelete Attribute 來明確辨識。當未設定 Attribute 時,預設為 GET 請求。
TIP
- 當設定
ApiControllerAttribute時,將無法透過UseEndpoints()、UseMvc()或UseMvcWithDefaultRoute等方法所定義的慣例路由來存取動作。 - 使用
UseMvc()等方法來設定路由時,慣例路由使用大括號{}來表示參數,例如:"{controller=Home}/{action=Index}/{id?}";而在 Route 屬性中,則使用中括號[],例如:"[controller]/[action]"。
HTTP 400 自動回應
在 ASP.NET Core Web API 中,HTTP 400 自動回應的機制使得無需手動驗證 Request Model 的合法性。這一功能是透過內建的 ModelStateInvalidFilter實現的,不再需要像在過去的 ASP.NET Web API 時期那樣,手動執行以下程式碼進行檢核:
if (!ModelState.IsValid) {
    return BadRequest(ModelState);
}繫結來源參數推斷
ASP.NET Core 提供了以下 Attribute,用於設定參數的繫結方式:
FromBody:要求本文。這個 Attribute 用於從 HTTP 請求的主體中繫結資料,通常用於 POST 請求,其中資料是透過請求主體傳送的。FromForm:要求本文中的表單資料。使用這個 Attribute 可以繫結來自 HTML 表單的資料,通常用於 POST 請求,其中資料以表單形式提交。FromHeader:要求標頭。這個 Attribute 用於從 HTTP 請求標頭中擷取資料,例如提取特定標頭的值。FromQuery:要求查詢字串參數。使用這個 Attribute 可以繫結來自 URL 查詢字串的資料,通常用於 GET 請求。FromRoute:來自目前要求的路由資料。這個 Attribute 用於繫結從路由中提取的資料,通常用於路由中定義的路由參數。FromServices:作為動作參數插入的要求服務。使用這個 Attribute 可以繫結來自 DI(Dependency Injection)容器的服務,使其可在動作方法中使用。
自動推斷的規則如下:
FromBody:會自動推斷未在 DI 容器中註冊的複雜型別參數,但會忽略一些特殊內建類型,如IFormCollection和CancellationToken。FromForm:專為IFormFile和IFormFileCollection這類型別的參數進行推斷。不會對任何簡單或自定義型別進行推斷。FromRoute:會根據符合路由範本參數的參數名稱進行推斷。若有多個路由符合參數,系統會視其為FromRoute。FromQuery:會針對任何其他參數進行推斷,而不是特定於路由的參數。
多部分/表單資料要求推斷
當參數型別為 IFormFile 和 IFormFileCollection 時,會自動推斷要求的內容為 multipart/form-data。
錯誤狀態碼的問題詳細資料
當狀態碼為 400 或以上時,回傳 ProblemDetails 型別。
回傳型別
在 Web API 中,常宣告的回傳型別有三種:具體型別、IActionResult 以及 ActionResult<T>(在 ASP.NET Core 2.1 中新增)。若 API 需要回傳資料,建議使用 ActionResult<T>。反之,若僅需回傳狀態碼等資訊,則使用 IActionResult。以下是它們的使用方式:
具體型別
[HttpGet("{id}")]
public string GetById(int? id) {
    // 這種方式只能回傳具體型別的資料,無法回傳 ActionResult
    // if (!id.HasValue)
    // {
    //     return BadRequest("Invalid id");
    // }

    // 直接回傳值
    return $"GET method with id {id}";
}IActionResult
[HttpGet("{id}")]
public IActionResult GetById(int? id) {
    // 使用 IActionResult,可以回傳多種 ActionResult 型別
    if (!id.HasValue) {
        // 回傳 400 Bad Request
        return BadRequest("Invalid id");
    }

    // 若要回傳值,透過 Ok() 包裝
    return Ok($"GET method with id {id}");
}[HttpGet("{id}")]
public ActionResult<string> GetById(int? id) {
// 使用 ActionResult<T>,同樣可以回傳多種 ActionResult 型別
if (!id.HasValue) {
// 回傳 400 Bad Request
return BadRequest("Invalid id");
}
// 也可直接回傳值
return $"GET method with id {id}";
}非同步寫法
在這段程式碼中,async 修飾詞顯示這是一個非同步方法,同時回傳型別改為使用 Task<T>,這是一種通用的慣例。通常,當採用非同步方法時,我們習慣在 Action 名稱的結尾添加「Async」,以清晰標示該方法是非同步的。
值得留意的是,當使用非 RESTful 寫法時,無論 Action 名稱是否以「Async」結尾,路由中的 Action 都不會包含「Async」。例如:/My/GetById/1。RESTful 寫法不受影響,因為它使用 HTTP 動詞進行對應,與 Action 名稱無關。
[HttpGet("{id}")]
public async Task<IActionResult> GetByIdAsync(int id) {
    return await Ok(service.GetByIdAsync(id));
}Swagger
Swagger 是一個強大的後端API視覺化工具,透過 Swagger UI,可以輕鬆生成具備互動性的網頁版API文件,同時提供便捷的API測試工具。
在ASP.NET Core Web API中,預設使用的 Swagger 套件是「Swashbuckle.AspNetCore」。若要深入了解完整的使用方法,請參考 開始使用 Swashbuckle 及 ASP.NET Core。這裡僅總結一些我常用的部分。
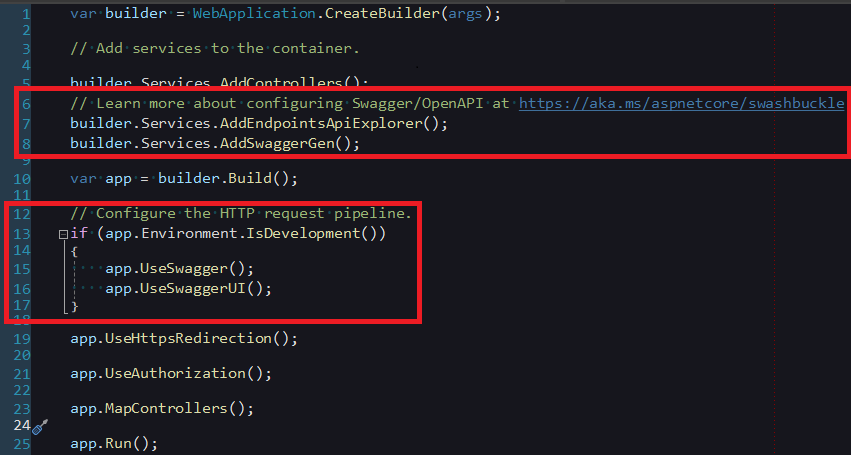
如前面講建立 Web API 專案時所述,當勾選「啟用 OpenAPI 支援」時,程式碼會自動新增以下內容:
builder.Services.AddEndpointsApiExplorer();
builder.Services.AddSwaggerGen();

if (app.Environment.IsDevelopment()) {
    app.UseSwagger();
    app.UseSwaggerUI();
}AddEndpointsApiExplorer(): 是 ASP.NET Core 內建的方法,僅在 Swagger 需要增加對最小 API 的支援時才需要使用。AddSwaggerGen(): 用於向 DI 容器中注入 Swagger 的相關服務。通常在這個方法中設定 Swagger 生成器,從應用程式的組件、Controller 和註釋中擷取 API 相關的資訊。UseSwagger(): 啟用 Swagger Middleware,使其在應用程式運行時提供Swagger文件。可透過「https://{Your Domain}/swagger/v1/swagger.json」查看生成的JSON檔案。UseSwaggerUI(): 啟用Swagger UI Middleware,生成一個互動式的網頁介面。預設的網址是「https://{Your Domain}/swagger/index.html」,頁面示例如下: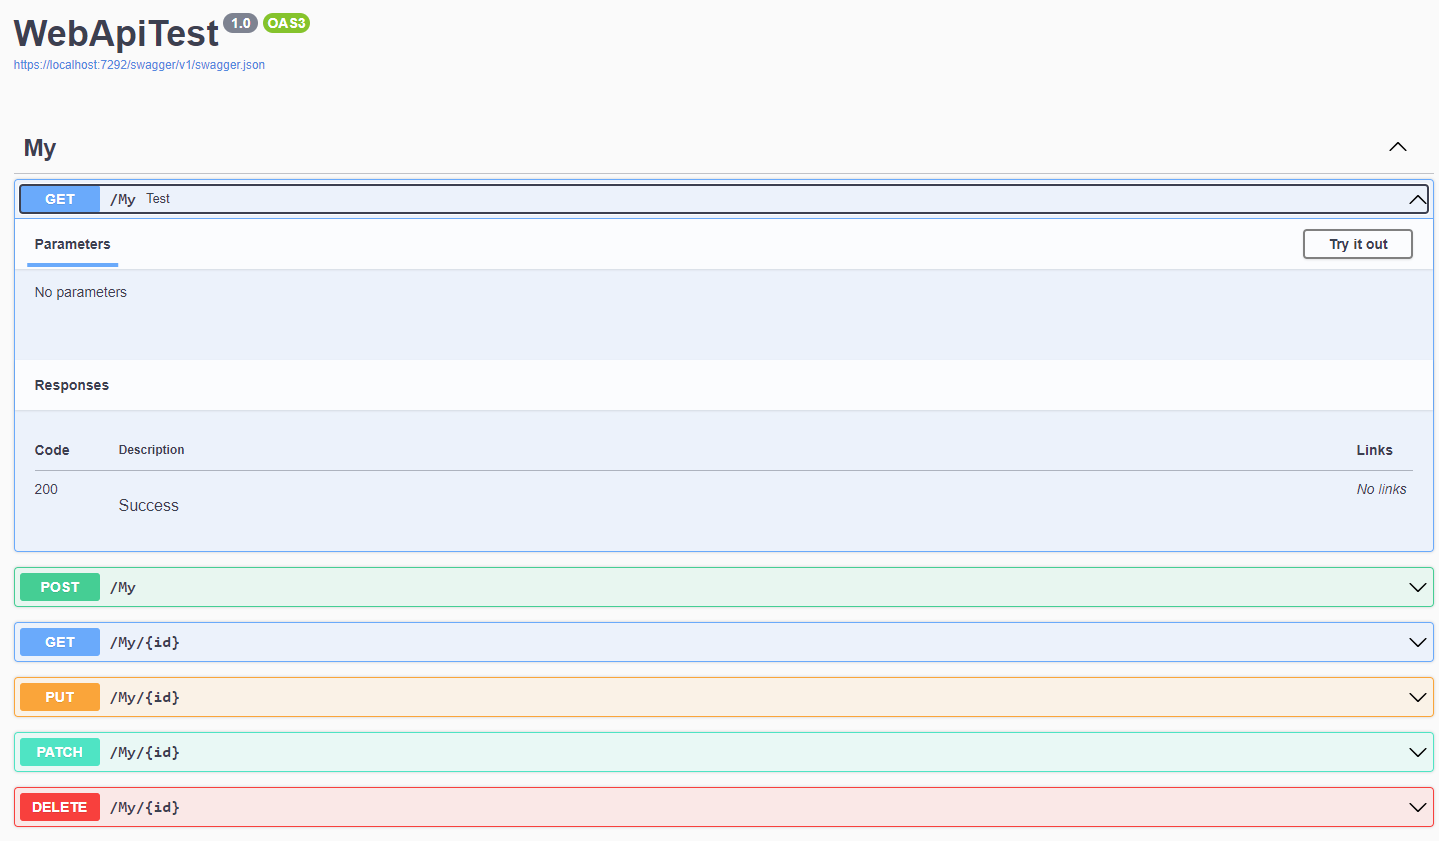
Swagger UI 必須依附於「swagger.json」,如果未使用
UseSwagger(),將無法正常運作。可使用下列程式碼更換網址中「swagger」的部分:csharpapp.UseSwaggerUI(opt => { // 設定RoutePrefix只會變更UI網址,而不會調整JSON位置 // 不可以寫「./swagger/v1/swagger.json」,否則路徑會變為「https://{Your Domain}/test/swagger/v1/swagger.json」而錯誤 opt.SwaggerEndpoint("/swagger/v1/swagger.json", "v1"); // 網址會變為https://{Your Domain}/test/index.html opt.RoutePrefix = "test"; });此外,還可以使用
opt.DocumentTitle來設定網頁的<head>標籤中的標題,或使用opt.InjectStylesheet({您的 CSS URL})來額外載入 CSS 樣式(請確保已搭配使用app.UseStaticFiles(),這裡就不詳述)。
WARNING
在 ASP.NET Core Web API 中,儘管未明確設定 HttpGet 等 HTPP Attribute,API 會被視為 GET 請求。然而,在 Swagger 中,若 Action 缺乏相應的 HTTP Attribute,可能導致無法正確呈現相關的描述內容,進而影響 Swagger UI 的運作。因此,在設計 API 時,不要設計非 Action 的 Public Method,應避免設計非 Action 的 Public Method,並為每個 Action 明確增加相應的 HTTP Attribute,以確保 Swagger 能夠正常運作。
額外增加輸入欄位
若希望在 API 設計中引入額外參數,而非透過 Action 參數傳遞,可以透過以下方式在 Swagger 中增加相應的輸入欄位:
建立 HeaderTokenFilter 類別,程式碼如下:
public class HeaderTokenFilter : IOperationFilter {
    public void Apply(OpenApiOperation operation, OperationFilterContext context) {
        operation.Parameters ??= new List<OpenApiParameter>();

        operation.Parameters.Add(new OpenApiParameter {
            Name = "Token",
            In = ParameterLocation.Header,
            Required = true,
            Schema = new OpenApiSchema {
                Type = "string"
            }
        });
    }

}在 Program.cs 中整合 SwaggerGen() 以下設定:
builder.Services.AddSwaggerGen(opt => {
    opt.OperationFilter<HeaderTokenFilter>();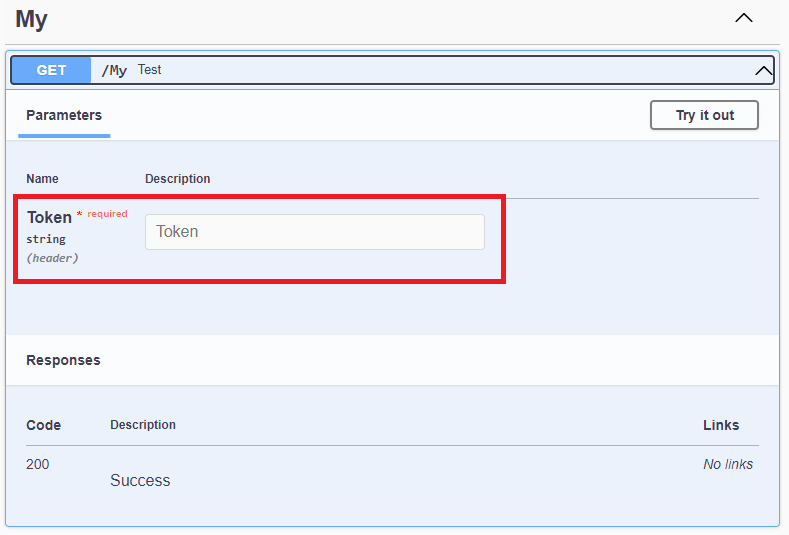
});在 Swagger UI 中將顯示新增的 Token 輸入欄位:
API 資訊與描述
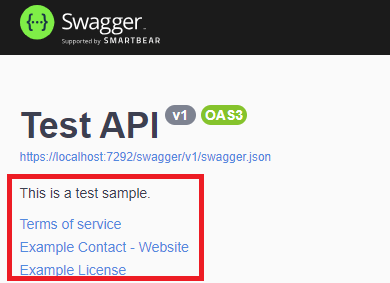
設定 API 作者、授權和描述
如果要指定 API 的作者、授權資訊和描述等,可透過以下程式碼進行設定:
builder.Services.AddSwaggerGen(opt => {
    opt.SwaggerDoc("v1", new OpenApiInfo {
        Version = "v1",
        Title = "Test API",
        Description = "This is a test sample.",
        TermsOfService = new Uri("https://example.com/terms"),
        Contact = new OpenApiContact {
            Name = "Example Contact",
            Url = new Uri("https://example.com/contact")
        },
        License = new OpenApiLicense {
            Name = "Example License",
            Url = new Uri("https://example.com/license")
        },
    });
});在 Swagger 中呈現的資訊如下:
相應的 swagger.json 內容如下:
"info": {
    "title": "Test API",
    "description": "This is a test sample.",
    "termsOfService": "https://example.com/terms",
    "contact": {
      "name": "Example Contact",
      "url": "https://example.com/contact"
    },
    "license": {
      "name": "Example License",
      "url": "https://example.com/license"
    },
    "version": "v1"
}整合 Web API 的 XML 註解至 Swagger
在 csproj 中進行以下設定:
<PropertyGroup>
  <!--產生文件-->
  <GenerateDocumentationFile>true</GenerateDocumentationFile>
  <!--如果要自己設定路徑和檔名,才需設定-->
  <!--<DocumentationFile>D:\\Doc.xml</DocumentationFile>-->
  <!--如果啟用文件,會造成專案中所以 public 和 protected 沒有 XML 註解的都出現警告,所以設定隱藏-->
  <NoWarn>$(NoWarn);1591</NoWarn>
</PropertyGroup>在 Program.cs 中整合 SwaggerGen() 以下設定:
builder.Services.AddSwaggerGen(opt => {
    // 如果有設定 DocumentationFile,請自行變更 XML 位置
    string xmlFilename = $"{Assembly.GetExecutingAssembly().GetName().Name}.xml";
    opt.IncludeXmlComments(Path.Combine(AppContext.BaseDirectory, xmlFilename));
});在 Action 中加入 XML 註解,例如:
/// <summary>
/// Gets information for a specific item.
/// </summary>
/// <param name="id">The unique identifier for the item.</param>
/// <returns>Information about the item.</returns>
/// <remarks>
/// Sample request:
///     GET: /My/1
/// </remarks>
/// <response code="400">If the identifier is null.</response>
[HttpGet("{id}")]
public ActionResult<string> GetById(int? id) {
    if (!id.HasValue) {
        return BadRequest();
    }
    return $"GET method with id {id}";
}Swagger UI 將顯示相對應的註解:
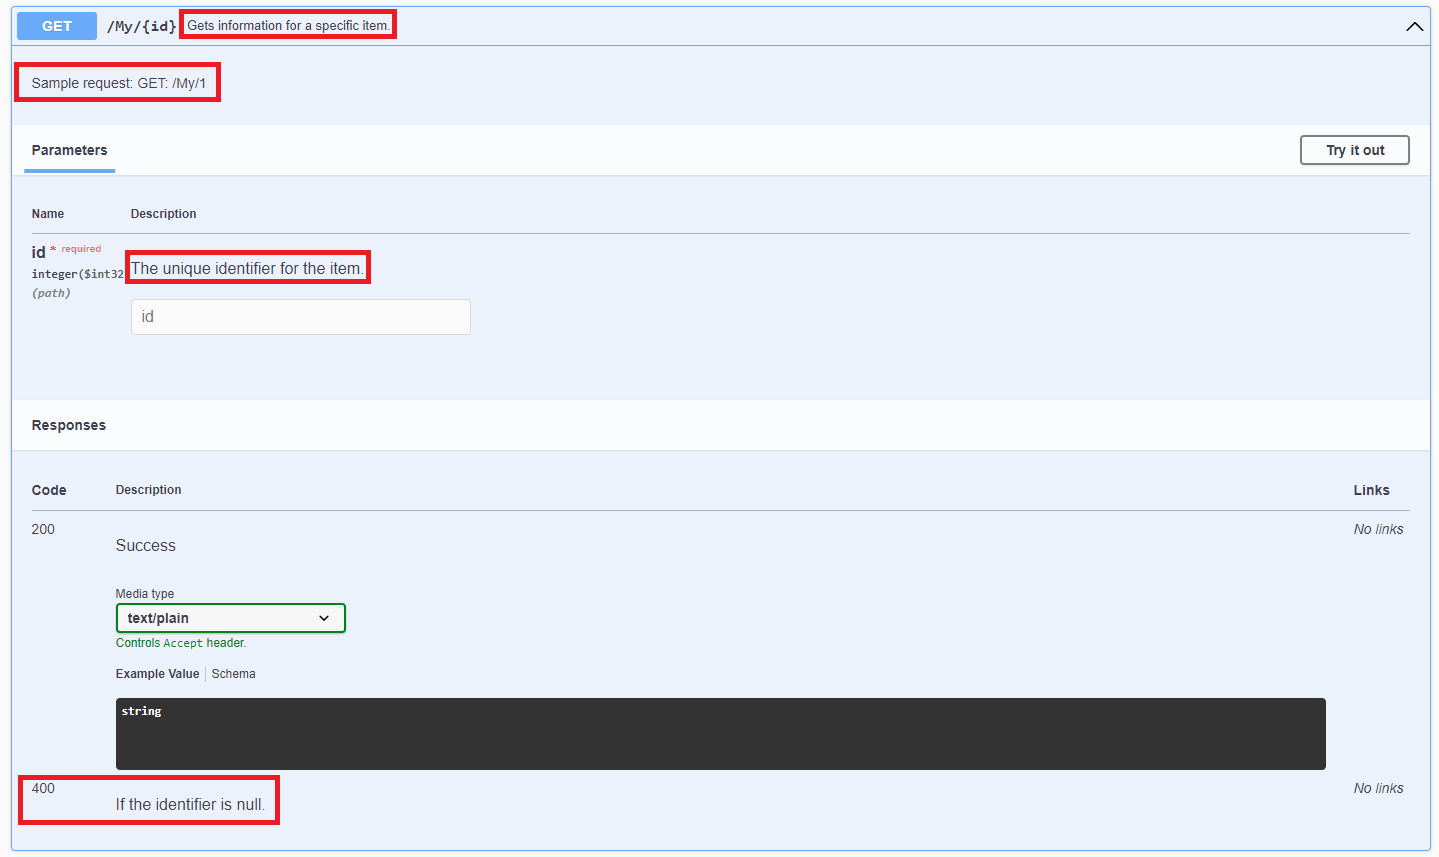
swagger.json 也會新增 summary、description 和 400 的內容:
"get": {
    "tags": [
      "My"
    ],
    "summary": "Gets information for a specific item.",
    "description": "Sample request:\r\n    GET: /My/1",
    "parameters": [
      {
        "name": "id",
        "in": "path",
        "description": "The unique identifier for the item.",
        "required": true,
        "schema": {
          "type": "integer",
          "format": "int32"
        }
      }
    ],
    "responses": {
      "200": {
        "description": "Success",
        "content": {
          "text/plain": {
            "schema": {
              "type": "string"
            }
          },
          "application/json": {
            "schema": {
              "type": "string"
            }
          },
          "text/json": {
            "schema": {
              "type": "string"
            }
          }
        }
      },
      "400": {
        "description": "If the identifier is null."
      }
    }
},XML 註解於 Input Model 或 Output Model
在 Input Model 的類別中加入 XML 註解,例如:
/// <summary>
/// Represents a test model.
/// </summary>
public class MyModel {
    /// <summary>
    /// Gets or sets the unique identifier.
    /// </summary>
    public int Id { get; set; }
}Swagger UI 將顯示相應的註解:
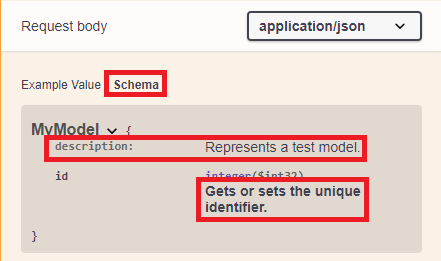
swagger.json 也會新增 description 的內容:
"components": {
    "schemas": {
      "MyModel": {
        "type": "object",
        "properties": {
          "id": {
            "type": "integer",
            "description": "Gets or sets the unique identifier.",
            "format": "int32"
          }
        },
        "additionalProperties": false,
        "description": "Represents a test model."
      },
      "MyPatchModel": {
        "type": "object",
        "additionalProperties": false
      }
    }
}異動歷程
- 2023-08-04 初版文件建立。